I’ve been feeling uninspired lately and I find it helpful to use a paper crafting kit to jump-start my creativity. I recently played with the Lovely Lavender Paper Pumpkin kit from January 2024 and came up with some cards.
I created this card for today’s post, taking inspiration from card sketch 265 by SketchNScrap. However, I must admit that I’m not completely satisfied with the outcome. Something is missing, but I don’t feel like making further changes. So, I have decided to leave it as it is.
I stumbled upon this card layout while browsing Pinterest last week, just like I did for Tuesday’s card. The card I saw belongs to Beth Adams, but I created my version using the Countryside Inn patterned paper and turned the card sideways. The long strips measure 7/8″ x 4-1/8″ and the short strips measure 7/8″ x 2-7/8″ while the center panel measures 1-15/16″ by 3-3/16″. The papers are attached to a 4″ x 5 1/4″ piece of Night of Navy cardstock and then mounted on a Petunia Pop card base. The little flower from the new Layers of Beauty stamp set was a last-minute addition to cover up an ink spot left by my finger.
Last week, I was feeling bored and decided to browse through Pinterest. Although it’s not something I typically do, I’m glad I did because I stumbled upon a card designed by Heidi Collins that I absolutely adored. As a result, I’ve created two versions of my own that I’m sharing today.
I started with a piece of basic white cardstock measuring 1 3/4″ x 6″ and added approximately 1/2″ wide strips of patterned paper to it at an angle. After filling it, I cut off the excess patterned paper along the edge of the cardstock. Initially, I made the card with the Lost Lagoon base, but I felt the top portion looked too plain so to make it more interesting, I embossed only the top part using the Distressed Tile 3D embossing folder. Next, I made the Very Vanilla card and attached the panel using dimensions to give it some interest.
Kristie and I designed eight cards for a Stamp-a-Stack we had on Saturday. Today I’m showing you the four cards Kristie made, I showed you my cards on Tuesday.
Kristie and I designed eight cards for a Stamp-a-Stack we had on Saturday. Today I’m showing you the four cards I made, I will show you her cards on Thursday.
I created these cards to showcase retiring stamp sets and use up some of my paper hoard. The first three cards were inspired by Kristie Marcotte (not the Kristie I run classes with) and were based on Freshly Made Sketch 625, CardzTV Sketch 2, and OWH Sketch 218, respectively.
This month, I learned a new embossing technique where I used the embossing folder as a stamp but I don’t actually emboss the paper. Although I’ve previously inked the folder and then embossed it, this was a different approach. To try this technique, I needed a stack of paper, water, and a rag to experiment with different options. I think this design looks better with a repeating pattern, my attempts with the Countryside Blossoms embossing folder did not turn out as pretty.
There are a few ways to apply ink to your embossing folder. I started by using sponge daubers, but eventually, I switched to using my ink pads directly. While the sponge daubers allow you to use multiple colors, I found it easier to use just the stamp pad.
For the technique, I began by applying ink to the side of the embossing folder that has the Stampin’ Up! logo. Then, I sprayed the folder with water, placed my watercolor paper onto it, closed the folder, and used a brayer to apply even pressure. Please note that this technique does not involve actual embossing, but it can still yield beautiful results. If you decide to emboss, I think it would also be beautiful.
I really marvel at Kendra’s Card Challenges because she uses such unique layouts that inspire me. However, I tend to make quite a mess on my craft table with all the supplies I pull out to make them.
I created all of these cards using Kendra’s Card Challenge 14. Although I followed the instructions for most of the cards, for some of them, I swapped out the recommended paper because the color combinations didn’t look good together. There were a few combinations that I didn’t like, but I still decided to keep them.
I just wanted to share something with you! I’m a big fan of sketches and making multiple cards at once. So, I pulled out the April 2024 Sheetload of Cards and made many cards using it. The first two cards I made following the directions, but I realized the patterns were too bold for my liking. So, I modified the rest of the cards using a 3 1/4″ x 4 1/2″ mat and added a piece of 1″ wide white cardstock to tone down the patterns. I drew where I needed to cut the piece using a pencil and ruler and then stamped my sentiment. It turned out pretty well!
I would like to say thank you to the woman who created the instructional videos on how to make sketch #4 for Kendra’s Card Challenge #14. Her use of temporary tape to hold some of the pieces in place was a brilliant idea that helped me tremendously with this card. If I had used this method before, I had sadly forgotten it. Thank you once again!
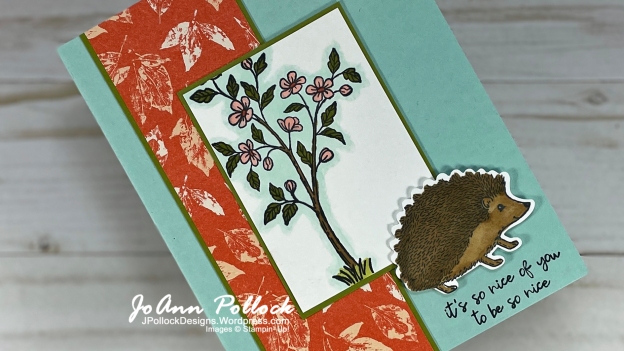
I was inspired by Sketch 644 from the “Try a Sketch on Tuesday” Challenge. I use the Happy Hedgehogs stamp set, coordinating punch, and the Inked Botanicals patterned paper for this project. I colored the tree using Calypso Coral and Old Olive Stampin’ Blends, then outlined it with the light Pool Party Stampin’ Blend. The hedgehog was colored using the Pecan Pie Stampin’ Blends.